How to use Chroma Studio in Synapse 3
Razerthink- The Chroma Studio section allows you to create and edit your own Chroma Effects that can be applied to any Razer Chroma-enabled device.
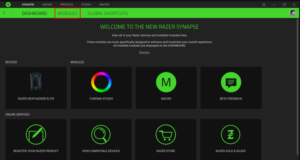
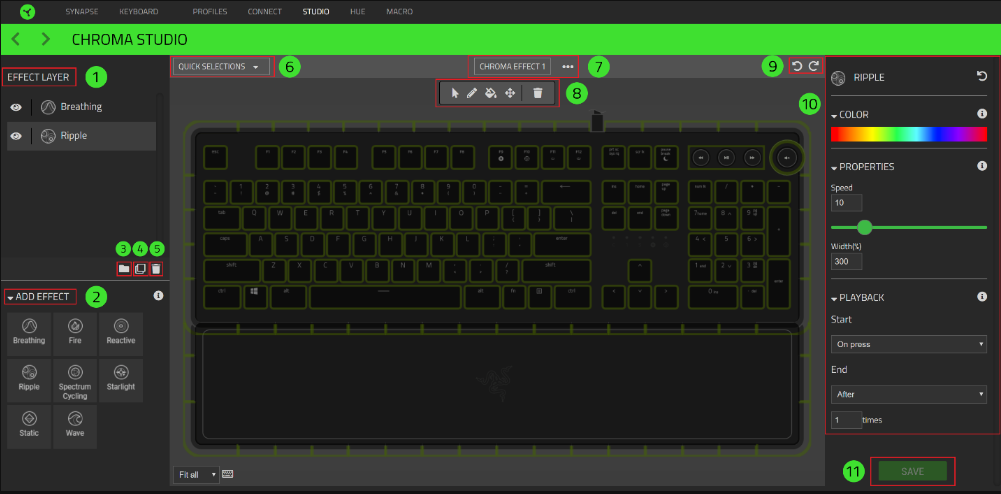
1. Open Razer Synapse 3 and navigate to “STUDIO” from the top tab

2. There are several options to use in Chroma Studio:
- Layer effects – Additional effects can be seen in this section.
- Add Effect – Under this section, you select the desired effect.
- Add Group – This option creates a group for your effect layer.
- Duplicate effect – This option duplicates the selected effect.
- Remove effect – This option removes the selected effect.
- Quick Selection – This is a dropdown menu with presets to customize your Razer device easily.
- Chroma Profile – This shows the Chroma Profile you are working on or editing.
- Tools – These denote tools for selection and editing.
- Undo / Redo – Undo and redo your last action.
- Effect settings – This column displays many settings for lighting effects such as color, speed and more.
- 1Save – Click to save your settings.
For more information, see the Chroma Studio Online Master Guide.
How to use Chroma sync
To use Chroma Sync in Razer Synapse, follow these steps:
- Install Razer Synapse: Download and install the latest version of Razer Synapse from the official Razer website. Make sure your Razer devices are connected to your computer.
- Launch Razer Synapse: Open Razer Synapse on your computer. You may need to sign in with your Razer ID or create a new account if you don’t have one.
- Access Chroma Sync: Locate the “Chroma Studio” tab or section within Razer Synapse. This is where you’ll find the Chroma Sync functionality.
- Enable Chroma Sync: In the Chroma Studio section, look for the Chroma Sync option and enable it. This will allow you to sync lighting effects across multiple Razer devices.
- Select Lighting Effects: Choose the lighting effects you want to sync across your Razer devices. Razer Synapse offers a variety of preset effects, such as Spectrum Cycling, Breathing, or Wave. You can also create custom effects or import profiles created by the community.
- Apply Chroma Sync: Once you’ve selected the desired lighting effects, click the “Apply” or “Sync” button to synchronize the effects across your Razer devices. You should see the lighting effects change on all compatible devices simultaneously.
- Customize and Fine-tune: To further customize your lighting effects, you can adjust parameters like colour, speed, direction, or intensity. Explore the options within Chroma Sync or Chroma Studio to personalize your lighting setup.
- Save and Manage Profiles: Razer Synapse allows you to save and manage different profiles for your lighting setups. Consider creating separate profiles for different games or applications to have the perfect lighting for each scenario.
- Test and Enjoy: Verify the Chroma Sync effects work correctly by launching a supported game or application. You should see the synchronized lighting effects on your Razer devices, enhancing your gaming or desktop experience.
- Update and Explore: Periodically check for Razer Synapse and Chroma Sync updates to ensure you have the latest features and improvements. Additionally, explore other advanced features of Razer Synapse, such as integrating with compatible apps or devices to expand your lighting possibilities.
Remember, the exact steps and options within Razer Synapse may vary slightly based on your version. Consult the official Razer documentation or support resources for specific guidance if needed.
Frequently Asked Questions
How to add the chroma effect to Synapse 3?
To add a Chroma lighting effect:
- Open Razer Synapse 3.
- Navigate to “STUDIO” from the top tab.
- Click the effect you want to add under “ADD EFFECT”. …
- Select an effect and apply the effect to your Razer product using the following application tools: …
- Click “SAVE,” which is located in the lower right corner of Chroma Studio.
How do I add a Razer Chroma profile to Synapse 3?
Import Profile
- Open Razer Synapse 3.
- Go to “CUSTOMIZE” and click the ellipsis.
- Click “Import.”
- Select the source of the imported file. …
- To import profiles stored in the cloud by your RazerID, select the profiles you want to import and click the “IMPORT” button.
How do I connect my Chroma studio?
Installation
- Make sure your Razer Synapse 3 is up to date.
- Launch Synapse 3 and select “MODULES.”
- If you already have Chroma Connect and need to remove or reinstall it, hover over it, click the “x” icon on the module, and click the “DELETE” button. …
- Hover over Chroma Connect and select “ADD.”